What is a layer in Docker?
In Docker, layers are a fundamental part of the image architecture that allows Docker to be efficient, fast, and portable. A Docker image is essentially built up from a series of layers, each representing a set of differences from the previous layer.
How layers are made -
- Base Layer: The starting point of an image, typically an operating system (OS) like Ubuntu, Alpine, or any other base image specified in a Dockerfile.
- Instruction Layers: Each command in a Dockerfile creates a new layer in the image. These include instructions like RUN, COPY, which modify the filesystem by installing packages, copying files from the host to the container, or making other changes. Each of these modifications creates a new layer on top of the base layer.
- Reusable & Shareable: Layers are cached and reusable across different images, which makes building and sharing images more efficient. If multiple images are built from the same base image or share common instructions, they can reuse the same layers, reducing storage space and speeding up image downloads and builds.
- Immutable: Once a layer is created, it cannot be changed. If a change is made, Docker creates a new layer that captures the difference. This immutability is key to Docker’s reliability and performance, as unchanged layers can be shared across images and containers.
Let’s see an example with a simple node js app. This is how our Dockerfile looks like.
FROM node:18-alpine                 # --- layer 1 --- #

WORKDIR /app                        # --- layer 2 --- #

COPY . .                            # --- layer 3 --- #

RUN npm install                     # --- layer 4 --- #
RUN npm run build                   # --- layer 5 --- #
RUN npx prisma generate             # --- layer 6 --- #

EXPOSE  3000

CMD ["node", "dist/index.js"]
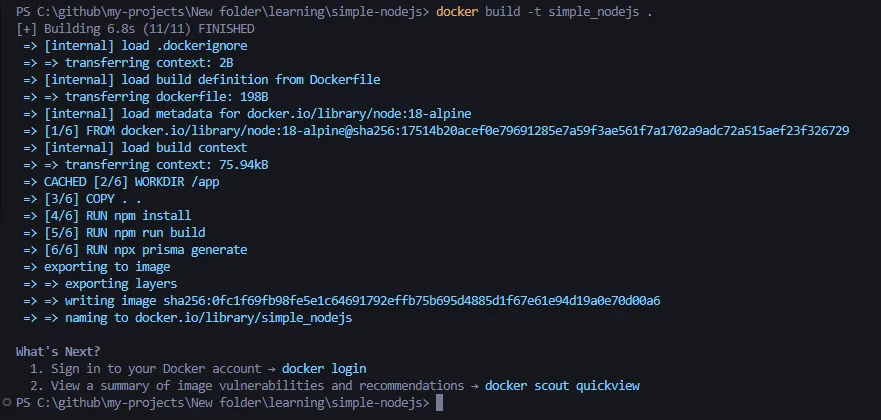
To build this image, we run the following command:
docker build -t simple_nodejs .
The terminal output will show the layers created for this image.

As we can see
- The base layer is the first layer created, which is the
node:18-alpineimage. - Then each
RUN,WORKDIR,COPYcommand creates a new layer. EXPOSEandCMDdoes not create a new layer in the image because they don’t modify the filesystem or the image contents.- Since layers can get re-used accross docker builds you see
CACHEDin 1/6.
Why use Layers ?
If you change your Dockerfile, layers can get re-used based on where the change was made.
We made changes to our source code or modified the package.json file (added a dependency):
FROM node:18-alpine                 # --- layer 1 - Cached--- #

WORKDIR /app                        # --- layer 2 - Cached --- #

COPY . .                            # --- layer 3 - Not Cached --- #

RUN npm install                     # --- layer 4 - Not Cached --- #
RUN npm run build                   # --- layer 5 - Not Cached --- #
RUN npx prisma generate             # --- layer 6 - Not Cached --- #

EXPOSE  3000

CMD ["node", "dist/index.js"]

Note: 1/6 and 2/6 layers are cached because they are not changed.
(Even though it doesn’t say it in the terminal, 1/6 is still cached)
Optimising the Dockerfile
How often do you think your dependencies change?
How often does the npm install layer need to change?
Wouldn’t it be nice if we could cache the npm install step considering dependencies don’t change very often?
We can take advantage of the fact that layers are cached and optimise our Dockerfile.
Let’s change our Dockerfile to the following:
FROM node:18-alpine

WORKDIR /app

COPY package* .
COPY ./prisma .
RUN npm install

COPY . .
RUN npm run build
RUN npx prisma generate

EXPOSE  3000

CMD ["node", "dist/index.js"]
Old File
FROM node:18-alpine

WORKDIR /app

COPY . .

RUN npm install
RUN npm run build
RUN npx prisma generate

EXPOSE  3000

CMD ["node", "dist/index.js"]
- We first copy over only the things that
npm installandnpx prisma generateneeds. - Then we run these scripts
- Then we copy over the rest of the source code
Then we can have two cases:
- Case 1 - You change your source code (but nothing in package.json/prisma)
FROM node:18-alpine                  # --- layer 1 - Cached --- #

WORKDIR /app                         # --- layer 2 - Cached --- #

COPY package* .                      # --- layer 3 - Cached --- #
COPY ./prisma .                      # --- layer 4 - Cached --- #

RUN npm run build                    # --- layer 5 - Cached --- #
RUN npx prisma generate              # --- layer 6 - Cached --- #
COPY . .                             # --- layer 7 - Not Cached --- #

EXPOSE  3000

CMD ["node", "dist/index.js"]
- Case 2 - You change the package.json file (added a dependency)
FROM node:18-alpine                  # --- layer 1 - Cached --- #

WORKDIR /app                         # --- layer 2 - Cached --- #

COPY package* .                      # --- layer 3 - Not Cached --- #
COPY ./prisma .                      # --- layer 4 - Not Cached --- #

RUN npm run build                    # --- layer 5 - Not Cached --- #
RUN npx prisma generate              # --- layer 6 - Not Cached --- #
COPY . .                             # --- layer 7 - Not Cached --- #

EXPOSE  3000

CMD ["node", "dist/index.js"]

